How to Find your Knife's Sharpening Angle
The right knife sharpening angle depends on your knife type and intended use. This complete guide covers angles for kitchen, EDC, hunting, and specialty knives — plus how to find your factory angle and why consistency matters more than precision.
Salvatore Emma
6/10/20266 min read

What Knife Sharpening Angle Should You Use? A Complete Guide
Pick up any knife sharpening guide and you'll find the word "angle" everywhere — but not always a straight answer about which one to use. The truth is there's no single universal angle. The right choice depends on what the knife is for, what steel it's made from, and whether you can actually hold that angle consistently.
This guide breaks it all down: what sharpening angles mean, which to use for every common knife type, how to find the angle already on your knife, and why consistency is the factor most people overlook.
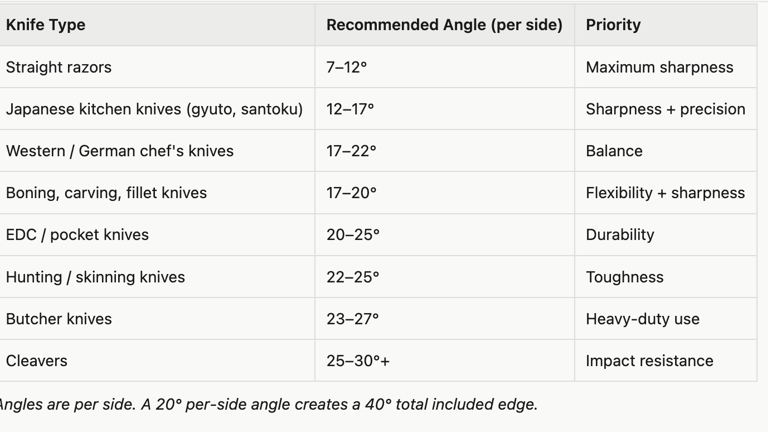
Quick Reference: Knife Sharpening Angle Chart
What Is a Knife Sharpening Angle — and Why Does It Matter?
The sharpening angle is the angle between the blade and the sharpening surface, measured per side. When manufacturers or sharpening guides quote a number like "20 degrees," they mean 20° per side, which creates a total 40° edge.
According to Dauntless Manufacturing, the sharpening angle "does more to determine final edge quality than almost anything else." Here's the trade-off at the core of every angle decision:
Lower angle = sharper but more fragile. The edge apex is thinner, which means it cuts more easily but also chips or rolls faster, especially under lateral stress or on hard foods.
Higher angle = more durable but less acute. More metal supports the edge, making it resistant to chipping and rolling, but it won't slice as cleanly.
The goal is matching the angle to the knife's job. A sushi chef's yanagi needs a nearly surgical edge. A hunting knife needs to hold up while processing game in the field. Neither extreme works for both tasks.
Kitchen Knives: Japanese vs. Western
This is where the 15° vs. 20° debate lives, and it's genuinely meaningful.
Japanese Kitchen Knives (10–17° per side)
Japanese knives — gyuto, santoku, nakiri, yanagi — are typically ground at shallower angles. TOG Knives recommends 15° per side as the standard. The reasoning: Japanese knife steel is harder (typically 60–65 HRC), which lets it hold an acute edge without folding. The result is a blade built for precision slicing through fish, vegetables, and delicate proteins.
The harder steel also means Japanese knives are more brittle. Drop one on a tile floor or use it on frozen meat and the edge can chip. The 15° angle maximizes sharpness on the assumption you're using the knife correctly.
Western / German Kitchen Knives (17–22° per side)
German and European-style knives — Wüsthof, Henckels, Victorinox — use softer steel (typically 56–58 HRC) and are ground at wider angles. Chef's Choice explains that this design emerged from Western cooking traditions, which involved heavier use: breaking down large cuts of meat, chopping through dense vegetables, and general-purpose prep.
The 20° angle gives the softer steel enough support to resist rolling. These knives hone well precisely because the slightly softer edge straightens easily on a honing rod.
The practical guideline: If you don't know what type of knife you have, 20° is the safer default. It works on almost everything without risking chipping. If you have a quality Japanese knife and you're careful with it, 15° will reward you with noticeably better slicing performance.
EDC and Pocket Knives (20–25° per side)
Everyday carry knives live a harder life than kitchen knives. They open packages, cut cord, scrape, pry (even when they shouldn't), and get carried in pockets with keys. AnglePilot puts EDC and pocket knives in the 22–25° range for this reason.
That said, many modern EDC knives with premium steels (S30V, M390, 20CV) hold a finer edge better than older soft stainless. If you have a high-end folder and treat it with care, 20° per side is a reasonable target. If you use your knife hard, 22–25° gives you an edge that lasts longer between touch-ups without chipping.
The key consideration for EDC: you're often sharpening in the field or without precision equipment. An angle that's slightly more forgiving (22°+) means real-world results closer to your target, even without a guided system.
Hunting and Outdoor Knives (22–27° per side)
Hunting knives — skinners, drop points, field knives — need toughness over pure sharpness. You're making sustained cuts through hide, connective tissue, and meat, often without the ability to stop and touch up the edge. TSPROF recommends 22–25° for hunting and skinning knives specifically, noting the need for both slicing ability and edge retention under sustained field use.
Survival knives and bushcraft blades can go even wider — up to 30° — if the intended use involves batoning wood, prying, or other abuse that would destroy a fine edge.
How to Find the Factory Angle on Your Knife
Before resharpening, it helps to know what angle you're starting with. Sharpening at a significantly different angle means grinding away a lot of metal before the new bevel takes over — which wastes time and shortens knife life.
Method 1: Check the manufacturer's specs. Most quality knife makers publish their factory angles. A quick search for "[brand name] sharpening angle" usually returns the answer. Wüsthof: 14° per side. Victorinox Fibrox: 15°. Benchmade: varies by model but typically 30–35° inclusive.
Method 2: The marker test. Color the bevel with a black permanent marker, then make a few strokes on your sharpening surface at your estimated angle. Where the marker is removed shows where the abrasive is actually contacting the blade. Adjust up or down until the marker wears evenly across the full width of the bevel. Work Sharp describes this as the most reliable low-tech method for angle identification.
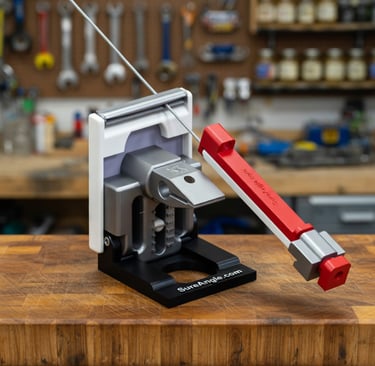
Method 3: Use a guided system. If you use a guided rod sharpener like the SureAngle SAM system, you can set the angle on the guide, make a few light strokes, and check with the marker method to confirm contact. Once set, the system holds that angle mechanically for every stroke — no guesswork required.
What Happens If You Sharpen at the Wrong Angle?
The consequences depend on which direction you're off.
Too low (shallower than ideal): The new bevel hasn't reached the edge yet, so you're sharpening behind the edge, not at it. The knife won't get sharper. You'll spend a lot of time removing metal before the bevel reaches the apex. If the steel is too soft for the angle, the resulting edge will chip or roll quickly in normal use.
Too high (steeper than ideal): You'll get a durable edge faster, but it won't be as sharp as the knife is capable of. For a Japanese knife designed for 15°, sharpening at 25° means you're working against the knife's design, producing a functional but underperforming edge.
Inconsistently: This is the most common problem. Sharpening Supplies notes that sharpening at inconsistent angles creates stacked micro-bevels — each session grinds a slightly different slope, so the edge never reaches a clean apex. The knife feels dull immediately after sharpening because the apex isn't actually where you think it is.
Does Consistency Matter More Than the Angle Itself?
Yes — and this point is underemphasized in most angle guides.
Vivront puts it directly: "Angle matters, but consistency usually matters more. A home cook who holds an angle reliably will get a better, longer-lasting edge than one who aims for a tighter angle and wanders through each stroke."
The difference between 17° and 20° is real but small in practice. The difference between a perfectly held 20° and a wandering 17–23° over the course of a session is enormous. Every degree of variation means more metal removed before the next session can reach the actual edge.
This is the core argument for guided sharpening systems over freehand sharpening — not that freehand is inferior as a skill, but that for most people most of the time, mechanical consistency beats estimated consistency.
There's an additional problem that standard guided systems don't address: even with a clamp and rod, the angle changes as the hone moves from the center of the blade toward the tip or heel. The rod pivots from a fixed central point, and the geometry of a straight line reaching increasingly distant contact points flattens the effective angle by 3–5° at the extremes. The SureAngle SAM system uses a patent-pending parabolic guide curve to correct this, keeping the angle consistent from tip to heel — which is exactly what "consistent angle" actually means when applied to the full blade, not just the center. Pair it with the SureAngle diamond hones and you have a complete system covering the full grit range from coarse to fine.
The Bottom Line: Choose the Angle Your Knife Is Designed For
The right sharpening angle isn't a matter of preference — it's built into your knife's design. Match the angle to the knife type, find the existing bevel before you start, and prioritize consistency over perfection.
If freehand sharpening isn't delivering reliable results, a guided system removes the human variable and lets the equipment do the geometry. That's not a shortcut — it's the smarter approach for anyone who wants professional edges without years of practice.
See the full SureAngle SAM sharpening system lineup →
New to sharpening? Start with our beginner's guide: How to Sharpen a Knife Correctly. Questions about your SAM system? Visit the SureAngle support page for assembly videos and instructions.
Sure Angle Parabolic Sharpening System
Sharpness Perfected
Contact
Newsletter
support@sureangle.com
(941) 800-2152
© 2026. All rights reserved.