Understanding Bevel Angles
We will discuss bevel angles on knifes as a foundation for improving sharpening results.
Salvatore Emma
4/21/20263 min read
Understanding Knife Bevel Angles: Why the Degree Matters More Than You Think
If you’ve ever wondered why one knife slices through tomatoes like butter while another struggles with the same task — or why your pocket knife holds up to tough jobs but your chef’s knife chips easily — the answer often comes down to the bevel angle.
The bevel (the angled part right at the cutting edge) determines the balance between sharpness and durability. Get it right, and your knife performs better and lasts longer. Get it wrong, and you’ll either fight for every cut or find yourself sharpening far too often.
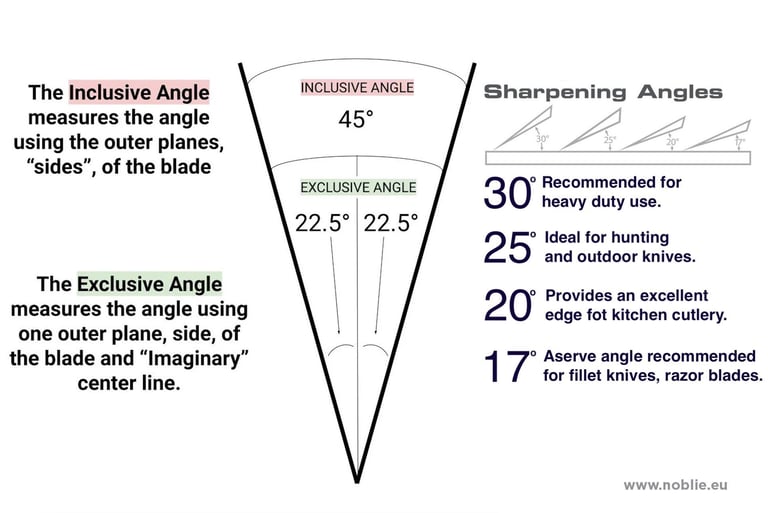
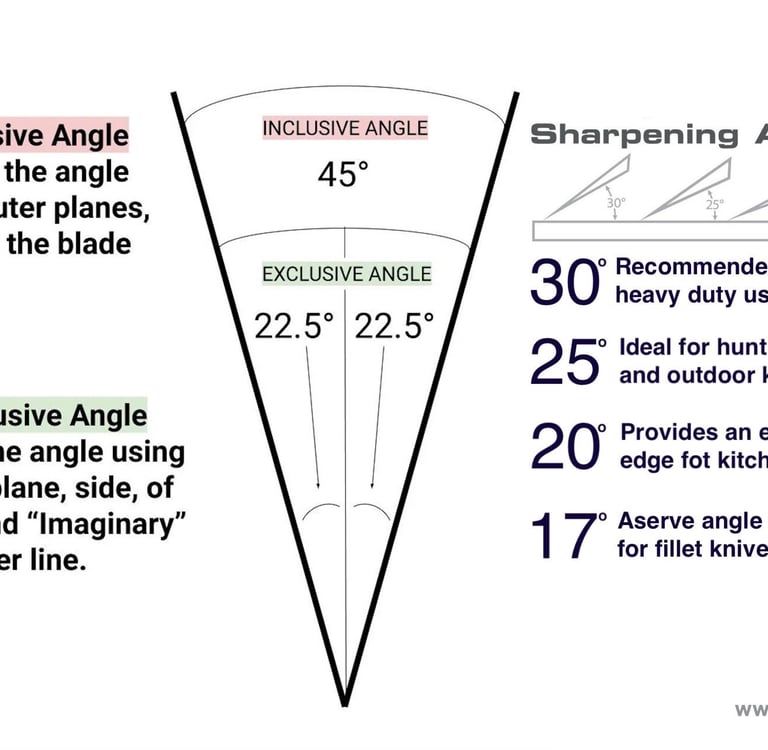
Inclusive vs. Exclusive Angles: Clearing Up the Confusion
Before diving into specific numbers, let’s clear up the terminology that confuses many sharpeners.
Exclusive angle (also called “degrees per side” or DPS): This measures the angle on one side of the blade only. Most sharpening guides and guided systems (including many angle cubes and jigs) use this measurement.
Inclusive angle: This is the total angle formed by both sides of the edge combined. It’s simply double the exclusive angle on a symmetrical double-bevel knife.
For example: A common kitchen knife sharpened at 20° per side has a 40° inclusive angle.
Always check whether your sharpener, jig, or manufacturer specs are referring to per-side or inclusive angles — mixing them up can accidentally create a much steeper (or shallower) edge than intended.
How Bevel Angle Affects Performance
Lower angles (shallower bevel) = thinner, keener edge → Exceptional sharpness and effortless slicing, but more fragile and prone to chipping or rolling.
Higher angles (steeper bevel) = thicker, stronger edge → Greater durability and resistance to damage, but slightly less “slicey” on delicate tasks.
The goal is to match the angle to the knife’s intended use and steel type. Harder steels (like many Japanese high-carbon or powder metallurgy blades) can often handle lower angles without chipping, while softer steels benefit from a touch more steel behind the edge.
Recommended Bevel Angles by Knife Type
Here’s a practical guide based on real-world use:
Kitchen Knives
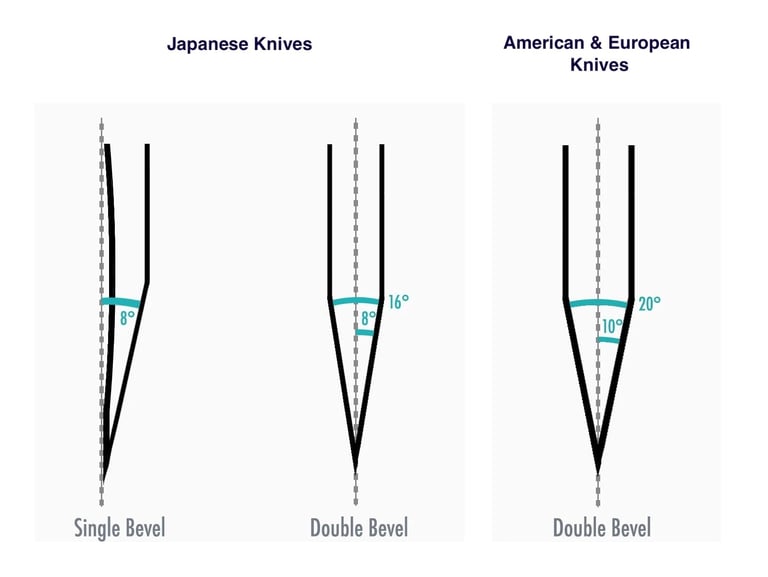
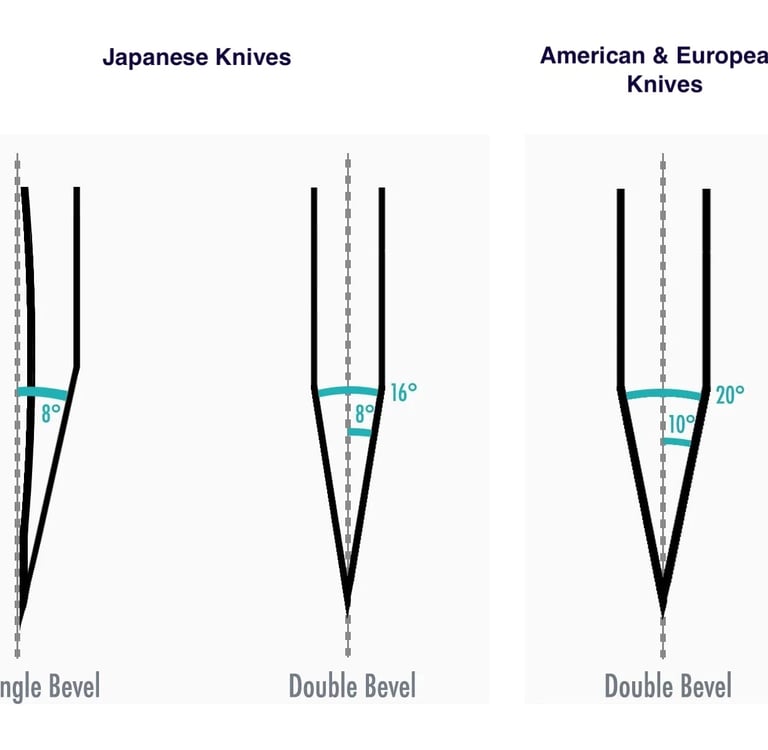
Western-style (German, French, etc.) chef’s knives, Santoku, paring knives: 18–22° per side (36–44° inclusive). This range offers a great everyday balance — sharp enough for precise food prep yet durable for regular use.
Japanese-style double-bevel knives: 15–17° per side (30–34° inclusive). These thinner edges excel at clean, push-cut slicing of vegetables, fish, and meat.
Japanese single-bevel (chisel-ground) knives (like traditional Deba or Yanagiba): Usually 12–15° on the beveled side, with the back side kept nearly flat (0–2°). These are specialized for precision and require a different technique.
Pocket, EDC, and Folding Knives 18–25° per side (36–50° inclusive) is the sweet spot for most users. This provides enough toughness for opening boxes, cutting rope, or light prying without the edge folding over quickly.
Hunting, Outdoor, and Bushcraft Knives 20–30° per side (40–60° inclusive). These blades often encounter bone, hide, wood, or heavy rope. A steeper angle helps the edge stay intact during demanding work. Many hunters prefer 22–25° per side as a reliable compromise.
Specialty Knives
Fillet and flexible boning knives: 15–18° per side for maximum flexibility and clean cuts through delicate flesh.
Cleavers and heavy choppers: 25–30°+ per side to withstand repeated impact.
Pro Tips for Choosing and Maintaining Your Angle
Match the factory edge when possible — Use the Sharpie method we’ve discussed before: color the existing bevel and take a few light passes on your stone. Even ink removal tells you you’re on the right track and preserving steel.
Consider adding a micro-bevel — After sharpening at your main angle, raise the spine slightly (1–2°) on your finest stone or during stropping. This creates a tiny reinforced edge that dramatically improves durability without sacrificing much sharpness.
Steel matters — High-end, hard steels can support lower angles. Softer or budget steels often perform better (and require less frequent sharpening) at slightly higher angles.
Test in real life — After sharpening, try the knife on your typical tasks. If it chips easily, increase the angle a couple of degrees next time. If it feels sluggish slicing soft foods, try dropping it slightly.
Final Thoughts
There’s no single “perfect” bevel angle — only the right one for how you actually use the knife. Understanding these differences helps you make smarter sharpening decisions, waste less steel, and get better performance from every blade in your collection.
Whether you’re a home cook keeping your chef’s knife razor-sharp or an outdoors enthusiast who needs a tough EDC edge, paying attention to bevel geometry pays off in smoother cuts and longer-lasting knives.
At Sure Angle, we designed our guided sharpening system to make hitting these precise angles repeatable and frustration-free — so you can focus on the results instead of guessing your hand position.
Have a favorite angle for a particular knife? Or a story about how changing your bevel transformed a blade’s performance? Drop a comment below — we’d love to hear it!
Sure Angle Parabolic Sharpening System
Sharpness Perfected
Contact
Newsletter
support@sureangle.com
(941) 800-2152
© 2026. All rights reserved.